


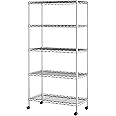
Seville Classics 5-Tier Wire Shelving with Wheels, 5-Tier, 30"" W x 14"" D (NEW MODEL), Chrome Plating, Plated Steel
Details
- Product Dimensions14"D x 30"W x
- Shelf TypeTiered Shelf
- Frame MaterialMetal
- BrandSeville
- ColorPlated Steel


Description
🚀 Elevate Your Space with Style and Functionality!
- HEAVY DUTY DESIGN - Each shelf supports up to 300 lbs, perfect for all your storage needs.
- TOOL FREE ASSEMBLY - Set up in minutes without any tools—because your time is valuable!
- EFFORTLESS MOBILITY - Equipped with 2” wheels, easily move your items wherever you need them.
- CUSTOMIZABLE HEIGHTS - Adjust shelves in 1” increments to fit your unique storage requirements.
- VERSATILE STORAGE SOLUTION - Transform any space with this sleek, mobile shelving unit.
The Seville Classics 5-Tier Wire Shelving with Wheels is a robust and versatile storage solution, featuring five adjustable steel wire shelves that can hold up to 300 lbs each. With dimensions of 30" W x 14" D and a height of 61.75" on wheels, this shelving unit is designed for easy mobility and customization, making it perfect for both home and office environments. Assembly is a breeze with no tools required, ensuring you can organize your space quickly and efficiently.


Specifications
| Item Weight | 2.3 Kilograms |
| Size | 5-Tier, 30" W x 14" D (NEW MODEL) |
| Item Dimensions D x W x H | 14"D x 30"W x 60"H |
| Furniture Finish | Alloy Steel |
| Style Name | 5-Tier, 30" W x 14" D |
| Color | Plated Steel |
| Frame Material | Metal |
| Product Care Instructions | Hand Wash Only |
| Material Type | Steel |
| Required Assembly | Yes |
| Maximum Weight Recommendation | 1500 Pounds |
| Number Of Shelves | 5 |
| Shelf Type | Tiered Shelf |
Reviews
G**N
Love love love these shelves!
These shelves are capable of holding quite a bit of weight, especially for something so lightweight. The 30” width is perfect for my studio/office, but can hold so much stuff with all the shelves. It’s VERY easy to assemble and the wheels work well. Very sturdy item!
M**O
Love it!
Omg its such a nice shelf! Very sturdy easy to assemble just took about 15 minutes to put together if that it’s nice and strong like the flimsy ones, I’ve seen before very roomy and holding my appliances nicely. I opted not to put my microwave on it because now I have counter space for it and since it’s a convection oven and fryer, I didn’t want to take the chance of it getting ruined when using the convection or the fryer or my food getting ruined but it’s a perfect addition if you don’t have enough cabinet space and need someplace to put your food your appliances or just junk. It’s a definite yes oh forgot to mention instructions are easy , an idiot proof. forgot to mention it comes with a warranty that will replace any damage parts for I believe it would said two years. Hopefully I won’t need them since I just got it but it’s a definite if you don’t have cabinet space and you need extra storage or even to put in the closet and you can even space the shelves anywhere you want at any time they’re really easy to move around. Doesn’t wobble holds so much and actually looks very nice and great quality!Had to add i ordered the gorilla grip shelf liners and Omg make such a great difference now the shelves look complete and nothing can fall through they fit perfectly and cleaning so easy. Just the finishing touch it needed!
E**W
The Secret to Life: Shelves, These Shelves (Also included: Instructions for Going it Alone)
TL;DR: Buy these shelves. It's super easy to put them together and oh, the space you will have.The Elle-aboration:I'm a small female living in a small apartment with NO storage. It's been driving me nuts, so I finally took the plunge and ordered three sets of these shelves - two for my walk-in closet that I finally reclaimed from my cats and one for my pantry.I was worried about the weight of the shelves - how to get them up the stairs, how to unpack them. I was worried about doing this alone. If those are your concerns, worry no more. Here's why:1. Yeah, the boxes themselves are 30ish pounds. Thankfully, UPS delivered them to my door, but even if they hadn't, I could have cut the boxes open and carried them up the stairs in a few trips. Do not let size/weight of these puppies deter you. Although I'm a little scrappy, I'm also a 5'2" female, well over 40, and wear a size 4ish, and if I can do it, you can do it.2. The shelves are super easy to assemble and lift. Even doing it by yourself. Even if you're on the smaller side and unhulky. Even if you're afraid of using wrenches and totally confused by lefty-loosey, righty-tighty (because eventually everything goes left and everything goes right so really...?). Even if you watch the videos and wonder if you can do that.You can.DO NOT FEAR THESE SHELVES.There are some tricks I'll share for how I did it in 10 minutes, first time out of the gate (or box, actually).The trick is to stay organized and begin on a waist-high horizontal surface. Not the floor. Here are the steps I followed that made it super easy:1. Unwrap and keep your bottom rods and top rods separate, just to stay organized. You'll receive 8 rods (4 top, 4 bottom). The bottom rods are where you put the feet or rollers, and there's a small hole where both will fit. You'll know it when you see it because the pieces are well-organized by the manufacturer. (Thanks, Seville!)2. Put the feet or the rollers into the bottom rods. I didn't even have to use the little wrench thing, but it's super easy to use, too. Put the round plugs into the top rods. Once you do that, you'll notice that both have holes with threads in them. That's where you're going to put the screws that hold them together, but don't do that yet and keep them separate.3. Decide where you want your lowest shelf to go and then take two of the black clamps that stabilize the shelves, make sure the arrow and "TOP" marked on each clamp are facing up, and clip them at the same time onto the rod. You'll notice there's a little line on the plastic pieces, and then there's the line on the rod. When the line on the plastic pieces line up to the line on the rod, they will click with each other. You may have to move them until you hear them click onto the rod. The first time you hear the click will be bliss because you'll know you've got this!4. Put that first bottom rod onto a horizontal surface, and then take your next rod, find the identical line, and place another set of clamps. If you work on a horizontal surface with the rods lying down, it's so much easier than counting lines and spaces. You can just line them up side-by-side, so much easier, and no crawling around on the floor.5. Put the clamps on the remaining two bottom rods, again working on a horizontal surface. When you finish, you can line the four bottom rods up side-by-side and (check) enjoy the symmetry of your excellent work.6. Take your first shelf (make sure you have it facing the right way), turn it sideways (as in put one of the long narrow sides of the shelf) onto the same horizontal surface, and slide the rods through that way. No lifting, no holding it up, no balancing on the short end. Take the easy way out. Once you slide all four rods though, you can set your shelf on the floor to feel good about yourself, but don't.7. Keep the shelf on its side with the four rods sticking out and place your second set of clamps onto each rod. It's much easier than trying to do it while the shelf is standing, and you can line them up visually.8. Slide the next shelf on the same way. Check to make sure that the two shelves are level (they are), and then once you have the two shelves in place, you can stand the whole thing on the floor, push the shelves down firmly, and finish the job.9. The third shelf is the trickiest because you have to decide if you want it on the bottom rod or on the top rod. The only reason this matters is because if you want it below the second rod, you'll put the clamps and shelf on before you screw the two rods together so that you're not trying to shimmy it all the way down. (I put my third shelf on first).10. Next, you have to screw the rods together. I was worried about messing up the threads because of one of the videos, but don't be. Just take your time. Put the threaded metal piece into the bottom rod, screw it in, and then screw in the top rods. All four rods will be securely in place and ready for the remaining shelves.11. All you have left to do is put your black clamps on and slide the rest of the shelves into place. You'll be working at eye level, so it's easy to line them up visually, the shelves aren't heavy, and it's maybe two minutes from this point.I found it very easy to do this way, maybe 10 minutes total?, and I know I'd have gotten frustrated crawling around on the floor and/or trying to do it vertically at the beginning. Counting the rungs and visually lining them up from above, no thanks. Ditto with shimmying them down the rods. Just no. (Editing to add: I did try one on the floor just to see, and no, no, just no.)Also, a couple of other things if you live in earthquake country like I do: I put my bottom shelf at the very lowest rung and plan to place heavy items at the bottom and a wedge underneath to keep it from tipping. I put my top shelf about four rungs down so that I can use it to place things and I can secure those things with an outer strap. Then I can use earthquake straps to secure the top of the rods to the wall.IDK if these instructions will help anyone, but I wish I'd known how really easy this was. All the videos I watched made me a little wary. Several said that it's easier with two people, someone actually screwed up the threading on the rods, someone else got their clamps misaligned, etc, and all that made me dread the undertaking. As soon as I started, I realized that waist-height horizontal surface and organization were the keys to fast success, and so I had to share in case it helps someone else.
L**L
Versatile storage - nicely constructed.
First, I paid for this item - no one gave it to me in return for my review. : )After seeing the cost of these types of shelves (on sale!) at the Container Store, I was happy to find this online. It's not as heavyweight but it's half the price.As steel shelving systems go, this one falls into the medium strength category. But I don't want it any heavy since I'm using it as a pantry. Boxes of pasta and canned goods just don't weigh that much no matter how I pack it.I was extremely pleased to find a unit this size. It fits precisely in a rather odd corner of my rather odd kitchen.It was well packages and each item well protected inside the box. The unit arrived with all the expected number of pieces plus a spare for the plastic sleeves - good planning - those little pieces are easy to lose. They are not so easy to break but still it is possible.The assembly instructions were an odd mixture of excellent detail and then mysterious figures which you have to puzzle out. Not hard, just dissonant.One of the poles was mismatched but someone observant had included an adapter and after a mystified minute, I managed to figure out that's what it was for. No, harm. Works justs as well as all the poles. Nice, very good quality control there.It is surprisingly light given the strength rating. What a relief. It was a snap to assemble. It's also clear you can disassemble it for transport. You'll need a rubber mallet or something to unstick the shelves. But it should survive many moves.It is dirt easy to line up the shelves and adjust the height of each one. Each pole is clearly scored with rings approximately 1 inch apart. Count off the rings, snap on a plastic sleeve and lower a shelf until it settles onto the sleeves. Wedge it down firmly (I sat down on the lower ones : )The ability to set the shelf levels at different heights is fantastic. It makes it so much more efficient. Since items run on the small size in home use - another shelf and having the poles rise higher by another 12" would have been feasible.I should mention you get your choice of either feet or casters. I choose the feet. The leveling feature is very very nice & easy to use. My laminate floor is too uneven to risk casters. I'm not sure I could stop a loaded runaway storage unit like this.If you don't already own some, buy few of the accessories, like the S hooks. You can hang off the wire shelf or use the "decorative" triangles on the edges of the shelf. They are wonderful. As soon as I collect some more of those nylon bags, I'm going to hang a few bags of onions and potatoes. BTW, you can hang bananas off the S hook. Forget those fancy banana hooks at those high end places. That solves the problem of the wire exerting pressure on delicate items. Should help prevent mold too. I'm not planning on doing too much of this. It blocks access and distributes weight oddly.I did not buy the shelf liners. My idea of misery is taking everything off so I can dust the liner. Wire shelves don't get too dusty and wipe off easily.How does it look? The selves look elegant. Since I don't have my stuff neatly packed in jars and boxes, it's messy. I suppose if I did, and lined everything up, it would look like a grocery store.I'm not anywhere near the weight limit for each shelf. Even cast iron pots don't add up that fast. Haven't felt the shelves strain once.It holds a lot of stuff. The 14" depth reallys makes a difference. By comparison, books shelves are usually 11". 14" is enough to fit boxes of file folders. Now if you filled this with boxes of files... I'd start to worry about weight limits and the thing tipping over.
Common Questions
Trustpilot
2 days ago
2 months ago
Get the App
